This is a series of blog posts documenting the process of building a Hugo theme from scratch: https://github.com/tomowang/hugo-theme-tailwind . The series includes four parts, and this is the first one:
- I. Introduction to the background of building the Hugo theme, my ideas for the theme’s features, and the development environment setup
- II. The main directory structure of the Hugo theme, the technologies involved, and the main framework of the theme I created
- III. Additional features of the Hugo theme, including dark mode, responsive design, multilingual support, code highlighting, and build pipeline
- IV. This part describes non-code-related content, including continuous integration (CI), how to submit to the official theme site, and SEO-related data
Background
As a developer with over ten years of experience, I’ve been exposed to various technologies, including frontend, backend, big data, and machine learning. When I wanted to share my personal development projects and life experiences, I decided to build a blog site.
During my initial search for a blogging platform, I considered options like WordPress, Hexo, Jekyll, and others. Ultimately, I chose Hugo for its static page generation capabilities, and I picked a nice domain name for my blog: tomo.dev .
The reason for choosing Hugo was simple. It’s developed in golang, making installation and build times fast. It’s open-source, has a well-established community, comprehensive official documentation, and a wide variety of open-source themes. Choosing a theme for your site can be a headache, but after browsing through numerous themes on the official theme site, I finally settled on a theme called hello friend.
hello friend has a clean page structure, relatively simple code, and supports dark mode and responsive design. I eventually wrote my first blog post: https://tomo.dev/posts/blog-using-hugo/
.
During the subsequent blogging process, I added some features and adjusted the page structure of the hello friend theme. For example, I added my GitHub address to the bottom navigation, modified some JavaScript code, and added some new third-party JavaScript libraries.
My native language is Chinese, and all my articles are written in Chinese. The blog didn’t receive much traffic for two years after its launch. In the latter half of 2023, I started to get involved in web site promotion, such as SEO. So I thought about translating my blog into English and doing some SEO experiments.
However, the hello friend theme itself doesn’t support multilingualism and its code is no longer maintained (although I later discovered a successor called hello friend ng). Additionally, I had been away from frontend development for a while and learned that tailwindcss was quite popular. Wanting to catch up with the latest frontend trends, I decided to build my own theme.
Features
Building a theme and using one are two completely different modes. When using a theme, most of the time you only need to understand simple configurations and be familiar with markdown syntax. However, building a theme is like developing a small product or plugin, and I had to answer the following questions:
- What will be the theme’s style and layout?
- What features should it have?
- What technical skills are required?
- How to publish, promote, and make it accessible to more people?
I’m not a product manager or a designer, but there are many open-source themes available for reference. I wanted my theme to have a clean layout like hello friend, minimize the use of complex frontend technologies, be easily extensible, and SEO-friendly.
Regarding technology, tailwindcss was a clear choice. I had used frontend component libraries like bootstrap, vuetify, and ant design, so learning a new CSS library shouldn’t be too difficult. As for Hugo theme-related technologies, I knew I needed some knowledge of html/template syntax in golang, and the rest I could look up in the official documentation as needed.
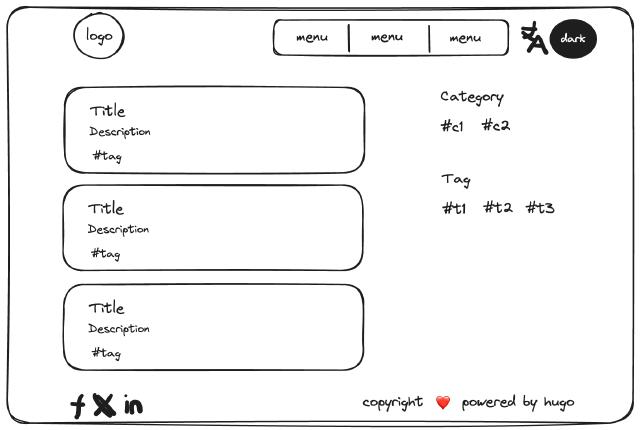
Finally, I referenced some existing themes and the tailwindcss example site to draw a simple page layout diagram, including a logo, navigation menu, multilingual switcher, dark mode switcher, article list, term display block, social media links in the footer, and copyright information.

Based on the prototype, I outlined the main features:
- Basic features: navigation and menu, list page, article page, right-side category list, and category list and detail pages
- Darkmode - dark theme switcher
- Responsive design
- Multilingual support
- Image processing
- Social media links in the bottom navigation
And other supporting features and hidden needs for open-source projects:
- Continuous integration
- Documentation and configuration examples
- Lighthouse score
- Others
- Experimenting with shortcodes
- Google Analytics configuration
- User comment functionality
- Social tags
- Code block copy functionality
Then I needed to give the theme a name. After browsing the official theme list, I finally chose hugo-theme-tailwind
. It turns out that a good name can bring some extra exposure and traffic to the project.
I initialized the GitHub repository and submitted the first commit #d833043 .
Development Environment Setup
To build a new Hugo theme, we need Hugo and Node.js. Installation of these tools is not the focus of this series, you can refer to the official documentation:
- hugo - https://gohugo.io/installation/
- nodejs environment - I use fnm and pnpm
With the Hugo command, execute the following command in the repository directory:
hugo new theme hugo-theme-tailwind
This command creates a folder themes/hugo-theme-tailwind in the current directory. We need to move it to our repository and remove the theme’s default content directory.
mv themes/hugo-theme-tailwind/* .
rm -rf themes/
rm -rf content
Download the official example site content to the theme’s exampleSite directory
git clone https://github.com/gohugoio/hugoBasicExample.git exampleSite
rm -rf exampleSite/.git
Add the theme configuration in the example site’s configuration file: theme = "hugo-theme-tailwind", and then run the command:
hugo server -s exampleSite --gc --themesDir=../..
This command starts the Hugo server, allowing us to test the initial rendering of the theme. The sample log output is as follows:
Start building sites …
                   | EN
-------------------+-----
  Pages            | 41
  Paginator pages  |  0
  Non-page files   |  0
  Static files     |  2
  Processed images |  0
  Aliases          |  9
  Sitemaps         |  1
  Cleaned          |  0

Built in 13175 ms
Environment: "development"
Serving pages from memory
Running in Fast Render Mode. For full rebuilds on change: hugo server --disableFastRender
Web Server is available at http://localhost:1313/ (bind address 127.0.0.1)
Press Ctrl+C to stop
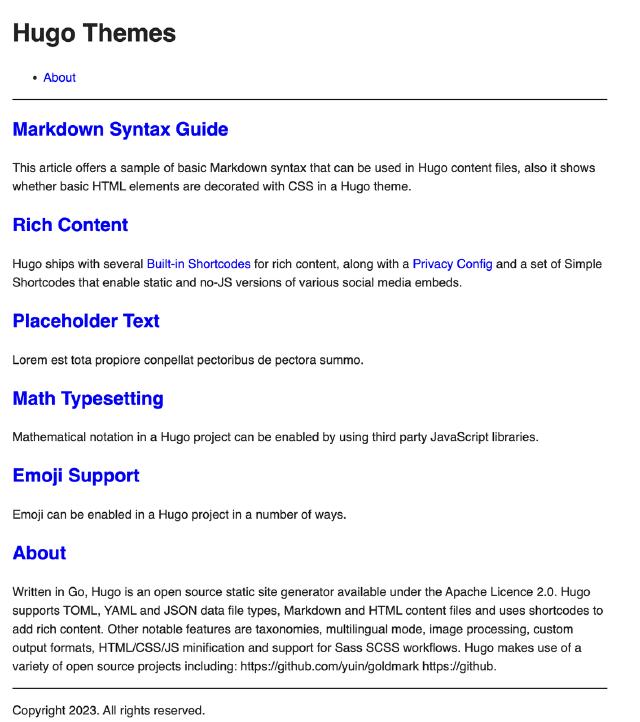
Visit http://localhost:1313/ to see a simple page as shown below:

Now we have a simple, runnable initial theme and example site. I will expand and rewrite based on this basic theme in the following sections.
