Preface
In the very first article /posts/blog-using-hugo/
I wrote about setting up my blog, I crafted a Makefile to compile and upload my blog to my remote server:
build:
	hugo --minify

deploy: build
	${RSYNC} public/ [email protected]:/var/www/tomo.dev/
Of course, as programmers, we’re inherently lazy and always seeking automation. In the past, I’ve used tools like Jenkins and Ansible, which actually fall under the realm of CI/CD. GitHub provides a powerful feature called GitHub Actions that can fulfill the needs of continuous integration and continuous delivery. GitHub’s official documentation offers a plethora of detailed tutorials and templates, which you can refer to at https://docs.github.com/en/actions , so I won’t delve into those here. This article primarily addresses security concerns related to keys when deploying to servers.
GitHub Actions
For security reasons, servers generally use public and private keys for SSH login and other operations. An even more secure approach involves setting a passphrase for the private key.
The GitHub Actions marketplace offers an action for installing SSH keys, available at https://github.com/marketplace/actions/install-ssh-key . However, this action doesn’t support encrypted private keys. The link provides several solutions:
- decrypting key beforehand: the best option, works on any VM
- sshpass command: next best, but not supported on Windows
- expect command: be cautious not to expose the passphrase to the console
- SSH_ASKPASS environment variable: might be troublesome
Solution 1 involves decrypting the encrypted private key and then configuring it in GitHub Secrets. The decryption command is openssl rsa -in ~/.ssh/id_rsa -out id_rsa_decrypt.
Solutions 2 and 3 involve using command-line tools to provide the passphrase for the private key.
Solution 4 uses the SSH_ASKPASS environment variable to provide the key.
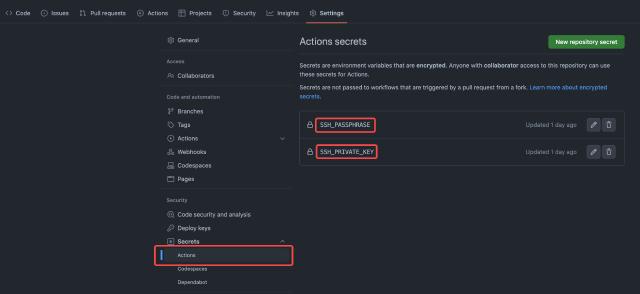
Here, we’ll use solution 4 in conjunction with ssh-agent. First, we need to configure our private key and passphrase in the repository, as shown below:

Place our deployment action file in the project’s .github/workflows directory. We want this GitHub Action to trigger on commits to the main or master branch, and then execute the following steps:
- Configure the private key and passphrase, and set up
ssh-agent. TheSSH_AUTH_SOCKenvironment variable ensures that the authentication agent can be shared across sessions. - Configure
known_hostsby adding our server domain name to theknown_hostsfile. - Fetch the repository code.
- Install
hugo. - Compile and transfer the static files to the server using
rsync.
The complete configuration content is as follows:
name: Deploy tomo.dev
env:
  # Use the same ssh-agent socket value across all jobs
  # Useful when a GH action is using SSH behind-the-scenes
  SSH_AUTH_SOCK: /tmp/ssh_agent.sock

on:
  push:
    branches:
    - main
    - master
jobs:
  deploy-to-server:
    runs-on: ubuntu-latest
    steps:
    # Start ssh-agent but set it to use the same ssh_auth_sock value.
    # The agent will be running in all steps after this, so it
    # should be one of the first.
    - name: Setup SSH passphrase
      env:
        SSH_PASSPHRASE: ${{secrets.SSH_PASSPHRASE}}
        SSH_PRIVATE_KEY: ${{secrets.SSH_PRIVATE_KEY}}
      run: |
        ssh-agent -a $SSH_AUTH_SOCK > /dev/null
        echo 'echo $SSH_PASSPHRASE' > ~/.ssh_askpass && chmod +x ~/.ssh_askpass
        echo "$SSH_PRIVATE_KEY" | tr -d '\r' | DISPLAY=None SSH_ASKPASS=~/.ssh_askpass ssh-add - >/dev/null

    - name: Adding Known Hosts
      run: mkdir -p ~/.ssh/ && ssh-keyscan -H tomo.dev >> ~/.ssh/known_hosts

    - name: Check out repository code
      uses: actions/checkout@v3

    - name: Install hugo
      run: sudo apt install -y hugo

    - name: deploy
      run: make deploy
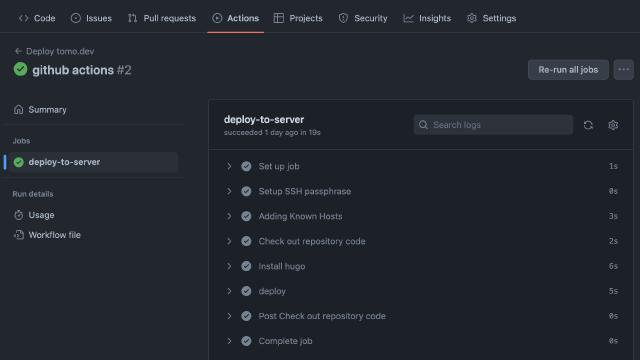
Finally, commit the code and push it. Open the Actions menu in your GitHub repository, and you should see a list like this:

Click on it to view the detailed steps and time taken for each execution:

From now on, there’s no need to manually run make deploy. You can check if the website has been updated after the action execution.