As a programmer, I’ve always wanted to track GitHub Trending projects. However, it’s very troublesome to manually check and browse the contents of GitHub repositories one by one on GitHub every time.
After getting in touch with n8n, I had an idea to use n8n to automatically track GitHub Trending projects, generate email notifications, and even automatically publish them to my blog site. I completed the setup of this workflow over the weekend and it’s running successfully. The following is an introduction to n8n and the process of setting up the workflow, which I’d like to share with you. And at the end of this article, you can copy the workflow JSON file.
Getting to Know n8n: Your Automation Superhero

n8n, short for nodemation, is an open-source and highly extensible workflow automation tool. Its GitHub repository is https://github.com/n8n-io/n8n , and it currently has 108K stars. It allows you to connect different applications, services, and data through an intuitive visual interface to create complex automation processes, thereby improving efficiency and reducing repetitive work.
Core features:
- Visual Workflow Editor: n8n provides an intuitive drag-and-drop interface that allows you to easily build and manage complex automation processes. Even users without any programming background can quickly get started.
- Rich Node Library: It has a large pre-built node library that supports connecting to almost all mainstream applications and services, including various APIs, databases (such as Supabase), SaaS platforms (such as GitHub, Slack), and custom Webhooks. This makes data flow and task collaboration extremely simple.
- High Flexibility: It supports various complex logical controls, such as conditional branches (if/else), loops (loop), and parallel execution. You can build highly customized automation processes according to your business needs.
- Self-hosted/Cloud Service Options: n8n offers great deployment flexibility. You can choose to privately deploy it on your own server to fully control data security and privacy. At the same time, n8n also provides cloud service options for quick start and management.
- Low-code/No-code Features: n8n skillfully balances ease of use and functionality. For non-technical personnel, it provides no-code drag-and-drop operations for quick automation. For developers, it allows embedding custom code (such as JavaScript) in the workflow to achieve more advanced and personalized feature extensions.
Compared with other automation tools on the market, the core advantage of n8n lies in its open-source nature and excellent extensibility. Open source means transparency, rapid community-driven development, and in-depth customization according to your specific needs. Its powerful node system and flexible programming capabilities enable it to not only meet daily simple automation needs but also handle complex enterprise-level workflow challenges, truly becoming your “automation superhero”.
Deploying Your n8n Environment: Embarking on the Automation Journey
n8n provides multiple self-hosted deployment methods, and the official provides a reference repository https://github.com/n8n-io/n8n-hosting .
Here, I use Docker Compose for deployment. To support OAuth-related authentication later, I also need to prepare a subdomain as the domain name for the n8n service. I need to resolve the domain name to the public IP address of the n8n service in advance.
- Create a directory for the service:
mkdir n8n-compose && cd n8n-compose - Refer to the official example
to create the files
docker-compose.ymlandinit-data.sh - Prepare the environment variable configuration file
.env(change the following configuration items to the actual values)
POSTGRES_USER=changeUser
POSTGRES_PASSWORD=changePassword
POSTGRES_DB=n8n

POSTGRES_NON_ROOT_USER=changeUser
POSTGRES_NON_ROOT_PASSWORD=changePassword

ENCRYPTION_KEY=changeEncryptionKey

N8N_EDITOR_BASE_URL=https://n8n.example.com
WEBHOOK_URL=https://n8n.example.com
- Add the environment variable configuration to the container configuration file
diff --git a/docker-compose/withPostgresAndWorker/docker-compose.yml b/docker-compose/withPostgresAndWorker/docker-compose.yml
index b5b2de6..2d8cdfc 100644
--- a/docker-compose/withPostgresAndWorker/docker-compose.yml
+++ b/docker-compose/withPostgresAndWorker/docker-compose.yml
@@ -19,6 +19,8 @@ x-shared: &shared
     - QUEUE_BULL_REDIS_HOST=redis
     - QUEUE_HEALTH_CHECK_ACTIVE=true
     - N8N_ENCRYPTION_KEY=${ENCRYPTION_KEY}
+    - N8N_EDITOR_BASE_URL=${N8N_EDITOR_BASE_URL}
+    - WEBHOOK_URL=${WEBHOOK_URL}
   links:
     - postgres
     - redis
- Start the container:
docker-compose up -d - Check the container status:
docker-compose ps, and you can get the following output
NAME                       COMMAND                  SERVICE             STATUS              PORTS
n8n-compose-n8n-1          "tini -- /docker-ent…"   n8n                 running             0.0.0.0:5678->5678/tcp, :::5678->5678/tcp
n8n-compose-n8n-worker-1   "tini -- /docker-ent…"   n8n-worker          running             5678/tcp
n8n-compose-postgres-1     "docker-entrypoint.s…"   postgres            running (healthy)   5432/tcp
n8n-compose-redis-1        "docker-entrypoint.s…"   redis               running (healthy)   6379/tcp
- Configure the reverse proxy service. For example, for Caddyserver, you can
add the following configuration to
/etc/caddy/Caddyfile
n8n.example.com {
    reverse_proxy localhost:5678
}
After the above configuration, you can access the n8n UI by visiting https://n8n.example.com.
You need to configure the administrator account and
password for the first visit.
Workflow Setup and Node Configuration
Next, it’s time for the workflow setup process. First, plan the overall workflow operation process:
- Regularly obtain the list of GitHub Trending projects and store them.
- Based on the stored project list, select suitable projects to obtain Git repository information, mainly the project README content.
- Use LLM to summarize the obtained information and output it in Markdown format.
- Send the output content via email or store it in the blog system.
I use Supabase’s database for data storage. My blog system is my personal blog website, which is built with Hugo and automatically deployed by GitHub Actions. The core nodes used in the whole process are:
The processes of obtaining the list of GitHub Trending projects, information summarization, and content publication have different time cycles, so I divide them into two different workflows.
Workflow 1 - Obtain and Store the List of GitHub Trending Projects

Since the list of GitHub Trending projects is dynamic and GitHub does not provide an official API, I wrote a Python script to obtain the list of GitHub Trending projects and packaged it as a local service to provide an API for the workflow. Most of the code was generated by LLM. This service has been open-sourced, and its address is https://github.com/tomowang/github-trending .
To allow n8n nodes to access this service, we need to run it in the network
corresponding to the n8n Docker Compose. Use the following command to start
the service (where n8n-compose_default is the network name of the n8n Docker
Compose):
docker run -d \
 -p 18000:8000 \
 --name github-trending \
 --restart always \
 --network n8n-compose_default \
 ghcr.io/tomowang/github-trending:latest
In n8n, use the HTTP Request node to access the local service. Configure it
as follows (note the URL part, using the service in the Docker network as
the domain name):
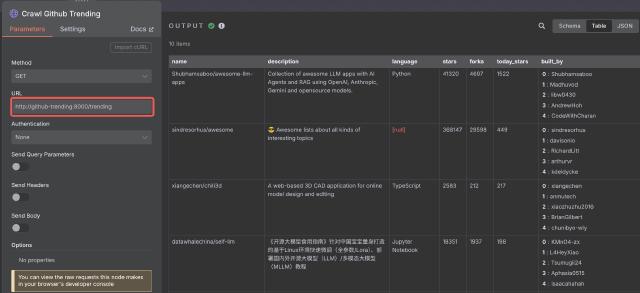
Subsequently, the Code node fills in additional information such as time and current list ranking. Finally, the data is stored using the Supabase node. The Supabase table structure is as follows:
create table public.trending_repos (
  id bigint generated by default as identity not null,
  name character varying not null default ''::character varying,
  description text null default ''::text,
  language character varying null default ''::character varying,
  stars integer null,
  forks integer null,
  today_stars integer null,
  built_by text[] null,
  date timestamp without time zone null,
  rank smallint null,
  constraint trending_repos_pkey primary key (id)
) TABLESPACE pg_default;
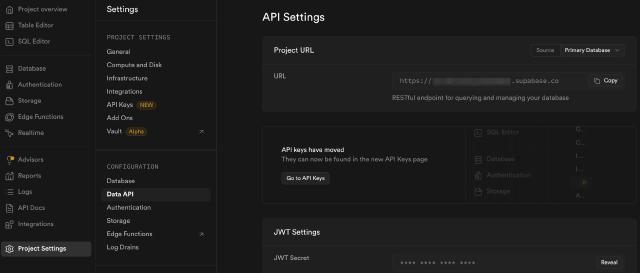
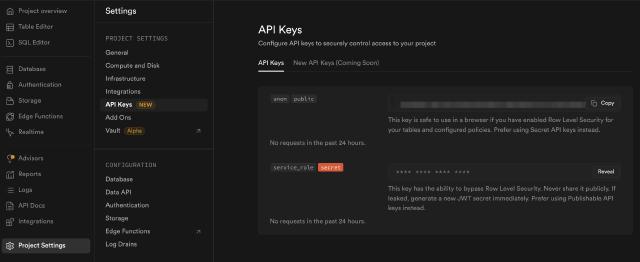
To use Supabase, we need to add Supabase authentication information:
- Obtain the Supabase Project URL information: Project Settings -> Data API -> Project URL
- Obtain the Supabase Project API Key information: Project Settings -> API Keys -> service_role
Refer to the official documentation https://docs.n8n.io/integrations/builtin/credentials/supabase/ for details.
After running the workflow, we can see the data in the Supabase console.

At this point, this workflow is created. We can set the workflow status toactive and use a timed trigger to obtain and store data once an hour as the
data source for subsequent workflows.
Workflow 2 - AI Summarization and Automated Publication of GitHub Trending Projects
With the hourly list of GitHub Trending projects, we can start summarizing project information. We need to plan the overall workflow operation process and clarify several requirements in advance:
- Since we fetch the list of GitHub Trending projects every hour, we need some strategies to select the projects to be summarized by AI.
- We need to avoid re-pushing projects that have already been summarized and pushed.
- We need to obtain project information from GitHub, especially the project README.
For the second requirement, we can use the Supabase node to store the information. Here is the Supabase table structure:
create table public.pushed_repos (
  id integer generated by default as identity not null,
  pushed_at timestamp with time zone not null default now(),
  name character varying not null,
  constraint pushed_repos_pkey primary key (id)
) TABLESPACE pg_default;
So the overall process is roughly as follows:
- Obtain the project list from the previously stored Supabase.
- Exclude the projects that have already been pushed.
- Select the projects to be pushed through a certain strategy.
- Obtain project information, mainly the README.
- Use a large language model to summarize the project information and README information.
- Use the Email node to push the summary.
- Publish the summary to the blog system through the GitHub node.
- Store the information of the pushed projects in Supabase.
The completed n8n workflow is as follows:

Next, we’ll explain some of the key nodes and processes.
Code Node & Built-in Methods and Variables
First, there’s our first code node, Filter out pushed repos.
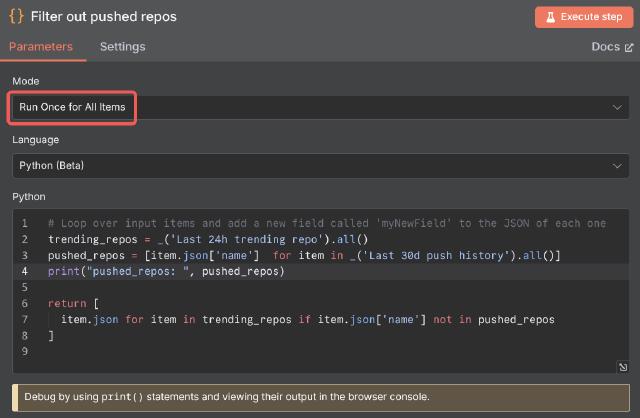
n8n supports code nodes in two languages, JavaScript and Python. Python is
supported by Pyodide
. In this example, we use
a Python node. In n8n, nodes default to looping
over the data passed in the workflow. However, we want to process the obtained
GitHub project information uniformly, so in this example, we configure the code
node to run in Run Once for All Items mode.
The official documentation states that the Code node takes longer to process Python than JavaScript due to the extra compilation steps. So if you’re after maximum performance, it’s advisable to use JavaScript code nodes.
In the code, we need to use built-in methods and variables to access the data passed from upstream nodes. JavaScript and Python use different naming conventions for variable access.
| JavaScript | Python | Description |
|---|---|---|
$input.item | _input.item | The input item of the current node |
$input.all() | _input.all() | All input items in current node |
$json | _json | Shorthand for $input.item.json or _input.item.json |
$("<node-name>").all() | _("<node-name>").all() | Returns all items from a given node |
After processing the data, we need to return it to downstream nodes for further processing. In n8n, data is transferred between nodes in the form of anarray of objects , structured as follows:
[
  {
    // For most data:
    // Wrap each item in another object, with the key 'json'
    "json": {
      // Example data
      "apple": "beets",
      "carrot": {
        "dill": 1
      }
    },
    // For binary data:
    // Wrap each item in another object, with the key 'binary'
    "binary": {
      // Example data
      "apple-picture": {
        "data": "....", // Base64 encoded binary data (required)
        "mimeType": "image/png", // Best practice to set if possible (optional)
        "fileExtension": "png", // Best practice to set if possible (optional)
        "fileName": "example.png" // Best practice to set if possible (optional)
      }
    }
  }
]
So in the example code node, we return an array of filtered item.json at the
end. The complete code is as follows:
# Loop over input items and add a new field called 'myNewField' to the JSON of each one
trending_repos = _('Last 24h trending repo').all()
pushed_repos = [item.json['name']  for item in _('Last 30d push history').all()]
print("pushed_repos: ", pushed_repos)

return [
  item.json for item in trending_repos if item.json['name'] not in pushed_repos
]
Additionally, if you need to debug your code, you can use console.log in
JavaScript or print() in Python. The debugging results will be output in the
browser’s debugging console.
HTTP Request Node
Since the native GitHub node doesn’t support retrieving a project’s README, we use the HTTP Request node for custom API calls. This approach also works for other systems that offer HTTP interfaces but lack dedicated nodes.
You can fetch a GitHub repository’s README via the GET /repos/{owner}/{repo}/readme
API. Refer to the API documentation
for details.
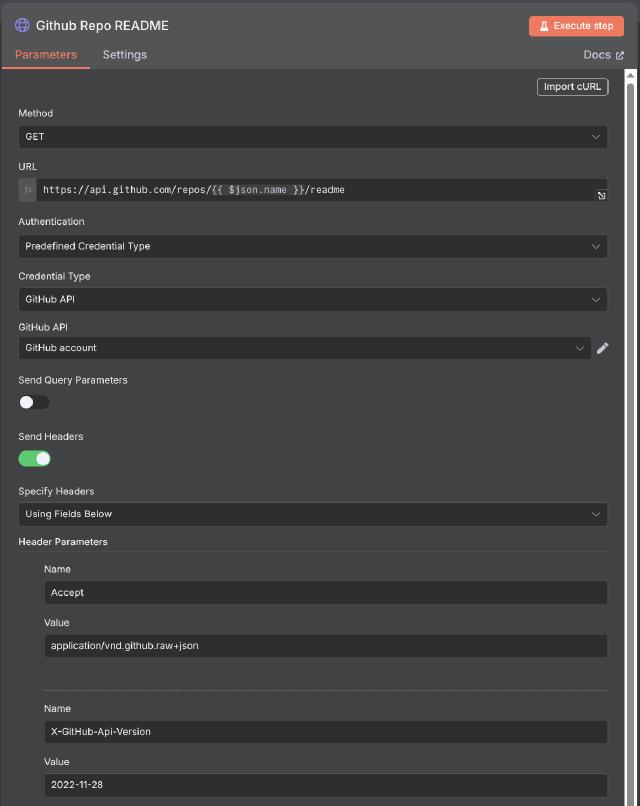
In this example, we use the GET method and set the Accept header toapplication/vnd.github.raw+json to get the raw README content.
For the request URL, we use {{ $json.name }} to access the project name passed
from the upstream node. Note that this only supports JavaScript code and
uses {{ }} for expressions
.
Regarding authentication, n8n recommends using predefined credential types when
available. Here, we authenticate with the GitHub API predefined credential type.
LLM Chain Node
n8n offers a wide range of LLM-related nodes under the Cluster Nodes . Cluster nodes are groups of nodes that work together, consisting of a root node and multiple sub-nodes.
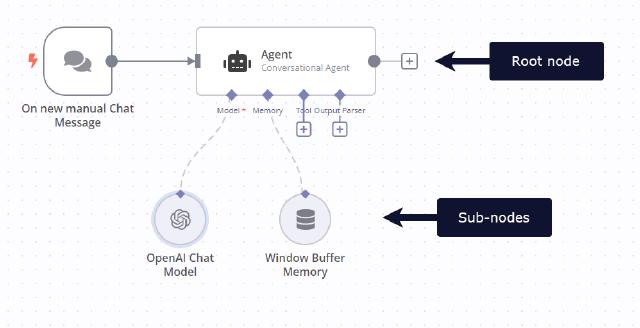
In this example, we use the Basic LLM Chain node to summarize project
information. It includes a root node and a large model sub-node.
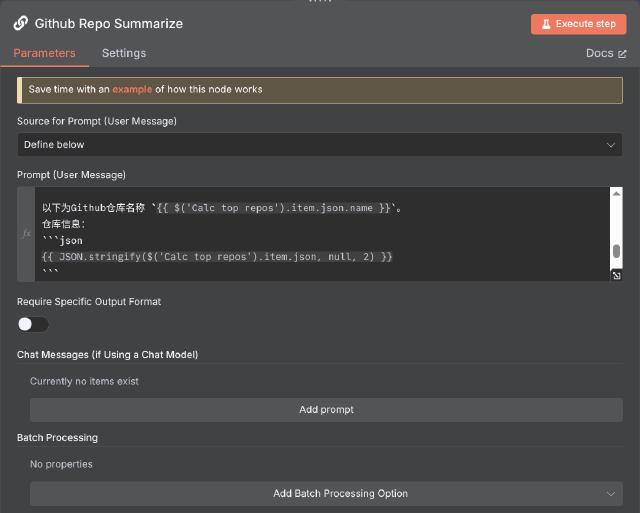
For the prompt, we use a preset mode. In the prompt, we use expressions to retrieve the GitHub project information and README obtained from previous nodes. Here are relevant snippets from the prompt:
以下为Github仓库名称 `{{ $('Calc top repos').item.json.name }}`。
仓库信息:
```json
{{ JSON.stringify($('Calc top repos').item.json, null, 2) }}
```

仓库原始README信息:
```markdown
{{ $json.data }}
```
The Basic LLM Chain node needs to be bound to a large language model. n8n
provides several large language model nodes, such as OpenAI and Hugging Face.
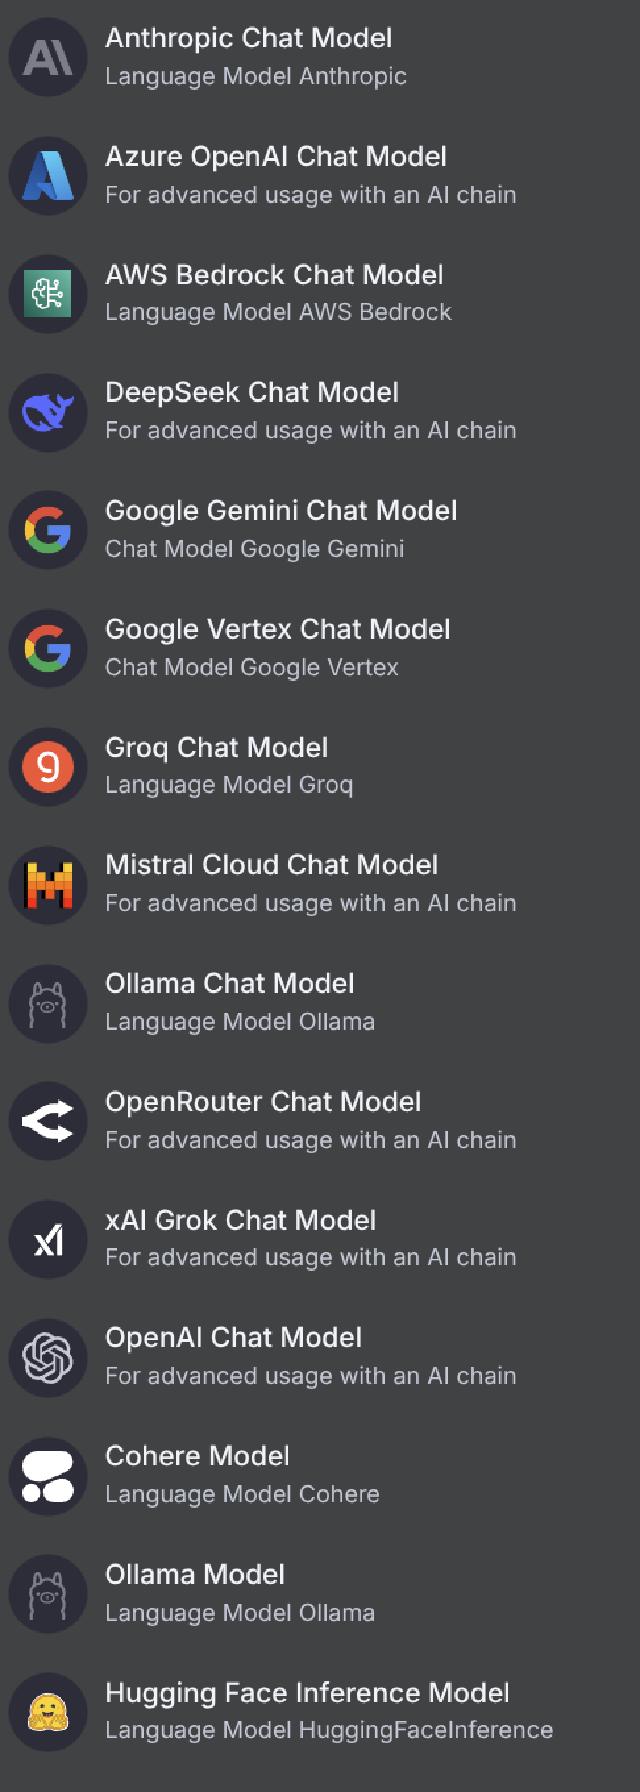
In this example, we use the Google Gemini Chat Model. After selecting this type
of node, add the corresponding authentication information (you can create an API
Key at https://aistudio.google.com/app/apikey
) and choose a model version,
such as gemini-2.5-flash-preview-05-20. With this setup, the Basic LLM Chain
node gains the ability to generate text based on the prompt information.
At the Conclusion: A Final Look Ahead
With the above workflow, we can automatically fetch, filter, and summarize GitHub project information, then automatically send emails and publish the content to the blog. Through the Execution panel, we can monitor the workflow process, view the actual input and output data of each node, and even estimate the token count.
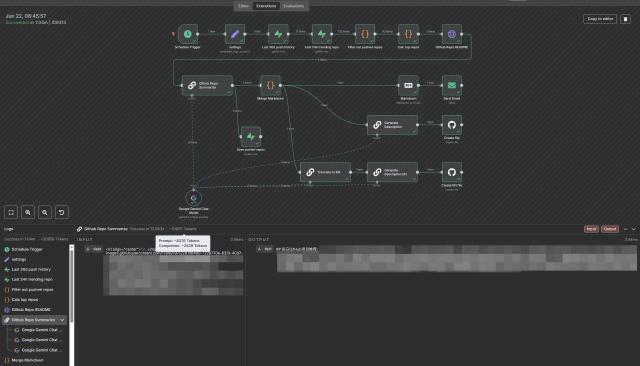
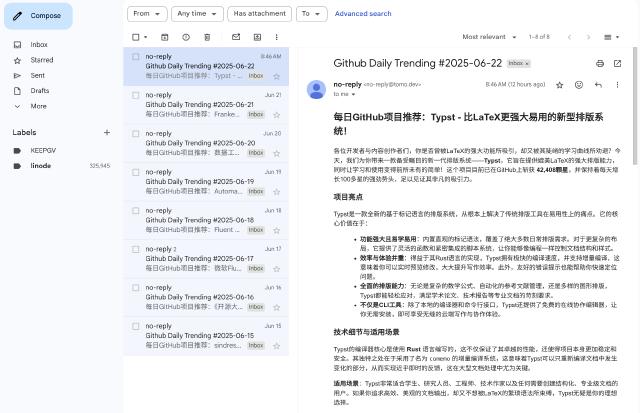
The final automatically published blog address is https://tomo.dev/aigc/ , and the automatically sent email is as follows:
This workflow demonstrates n8n’s powerful integration capabilities and flexible node configuration. Using similar methods, we can expand to more scenarios such as data source acquisition, processing, and large language model interpretation to achieve more automation tasks.
Finally, here are original workflow JSON files for your reference:
fetch github trending hourly
daily github trending