Preface
My daughter’s photos have filled up my phone, and I’ve been wanting to build a NAS to organize them. Commercial NAS options like Synology and QNAP seem to have average performance, and I haven’t decided on the configuration for building my own machine. During a conversation with friends, someone mentioned they were building a NAS with a pretty good configuration, so I decided to give it a try.
Hardware
Here’s the hardware list for the machine:
| Item | Model | Price |
|---|---|---|
| Motherboard | Changwang N5105 | ¥837 |
| Case | Jonsbo N2 | ¥689 |
| Power Supply | FSP 350W | ¥359 |
| RAM | Guangwei 16GB DDR4 3200 | ¥229*2 |
| SSD | Zhiti TiPlus5000 Gen3 1T | ¥469 |
| HDD | Seagate IronWolf 8T | ¥1268 |
Of course, some of the options above are overkill, like the RAM and SSD, and you can choose lower specs. The prices are also not the lowest online, just for reference. Some people have also modified N5105 soft router machines directly, which is much cheaper than buying a Jonsbo case and a separate motherboard.
Other miscellaneous accessories include: a front-mounted USB3.0 to 2.0 adapter cable for the case (20-pin to 9-pin), 6 SATA hard drive cables (3.0 straight to right-angle), and a four-wire PWM temperature-controlled speed regulator for the case fan (the N5105 motherboard has a 3-pin interface).
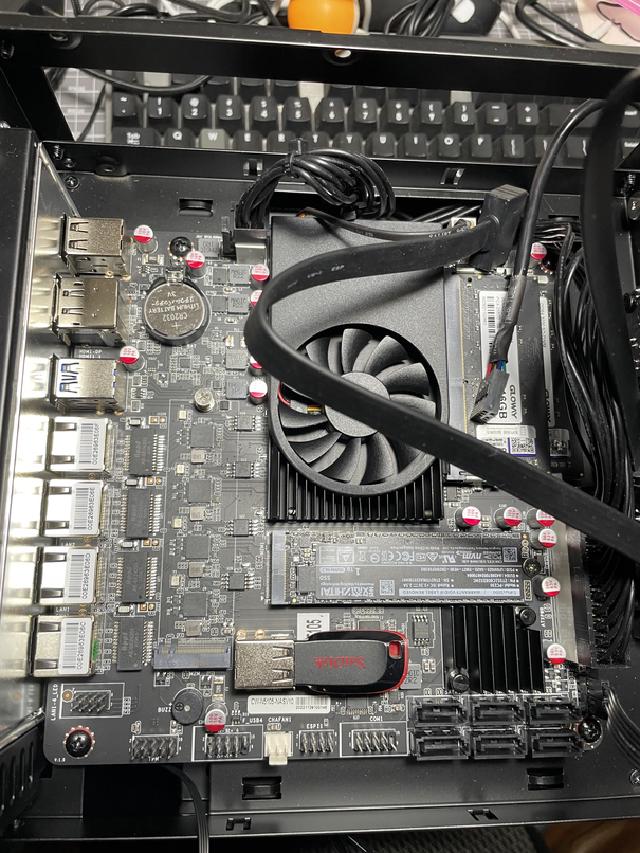
The overall assembly process went smoothly. Here’s a picture of the motherboard after installation, it powered on successfully.

System
One option for NAS is to directly install a black Synology system or OpenMediaVault. However, to fully utilize the hardware’s performance, you can consider adding a layer of virtualization. Common virtualization systems include PVE, ESXi, and Unraid, which is popular in the NAS community. You can refer to this Zhihu article for a detailed comparison of these three systems: ESXi, PVE, Unraid Comparison . Overall, Unraid offers some flexibility but requires a separate USB drive for booting and uses a less common Linux distribution, which I found not very user-friendly during my trial. PVE, based on the Debian distribution, offers good flexibility, but I was concerned about potential future maintenance issues. Ultimately, I decided on ESXi, as I was familiar with ESXi+vCenter from my previous work experience.
However, ESXi has removed many drivers in newer versions. Version 8 has some issues with m2 SSD and network card drivers, and it caused a major headache for me (my mechanical keyboard stopped working after entering the installation interface, which I initially thought was a driver issue with the SSD). But I managed to get it installed after some trial and error.
The official ESXi ISO image lacks some drivers, so we need to use the official offline bundle and community drivers to build our own image (there are also pre-built images with drivers available online, which you can try).
Installing PowerCLI
I use macOS, but you can refer to the official documentation for other systems. First, install PowerShell:
# set brew cask to ustc mirror
brew tap --custom-remote --force-auto-update homebrew/cask https://mirrors.ustc.edu.cn/homebrew-cask.git
brew install --cask powershell

# check installation
pwsh
PowerCLI requires a Python 3.7 environment, which you can install using pyenv. Download the PowerCLI offline installation package
from the official website.
In the pwsh environment, enter the command $env:PSModulePath to view the PowerShell module paths. Extract the downloaded offline installation package to one of these directories, such as /Users/tomo/.local/share/powershell/Modules. Finally, verify that the module is loaded correctly:
PS /Users/tomo> $env:PSModulePath
/Users/tomo/.local/share/powershell/Modules:/usr/local/share/powershell/Modules:/usr/local/microsoft/powershell/7/Modules

# Verify installation
PS /Users/tomo> Get-Module VMware* -ListAvailable

    Directory: /Users/tomo/.local/share/powershell/Modules

ModuleType Version    PreRelease Name                                PSEdition ExportedCommands
---------- -------    ---------- ----                                --------- ----------------
Script     12.6.0.19…            VMware.CloudServices                Desk      {Connect-Vcs, Disconnect-Vcs, Get-VcsOrganizationRole, Get-VcsService…}
Script     8.0.0.208…            VMware.DeployAutomation             Desk      {Add-CustomCertificate, Add-DeployRule, Add-ProxyServer, Add-ScriptBundle…}
Script     8.0.0.208…            VMware.ImageBuilder                 Desk      {Add-EsxSoftwareDepot, Add-EsxSoftwarePackage, Compare-EsxImageProfile, Export-EsxImageProfile…}
Manifest   13.0.0.20…            VMware.PowerCLI                     Desk
...
The output above indicates that PowerCLI has been installed successfully. You can refer to the official installation documentation for the complete installation process.
Building the Image
Next, we’ll use PowerCLI to build our own ESXi system image. First, download the following files from the official website:
- VMware vSphere Hypervisor (ESXi) Offline Bundle
- https://flings.vmware.com/community-nvme-driver-for-esxi
- https://flings.vmware.com/community-networking-driver-for-esxi
- https://flings.vmware.com/usb-network-native-driver-for-esxi
We’ll place these files in the ~/Downloads/ESXi directory. The file list should look like this:
VMware-ESXi-8.0b-21203435-depot.zip
nvme-community-driver_1.0.1.0-3vmw.700.1.0.15843807-component-18902434.zip
Net-Community-Driver_1.2.7.0-1vmw.700.1.0.15843807_19480755.zip
ESXi800-VMKUSB-NIC-FLING-61054763-component-20826251.zip
Continue in the PowerShell environment and execute the following commands:
# Add package and driver files
Add-EsxSoftwareDepot /Users/tomo/Downloads/ESXi/VMware-ESXi-8.0b-21203435-depot.zip
Add-EsxSoftwareDepot /Users/tomo/Downloads/ESXi/ESXi800-VMKUSB-NIC-FLING-61054763-component-20826251.zip
Add-EsxSoftwareDepot /Users/tomo/Downloads/ESXi/Net-Community-Driver_1.2.7.0-1vmw.700.1.0.15843807_19480755.zip
Add-EsxSoftwareDepot /Users/tomo/Downloads/ESXi/nvme-community-driver_1.0.1.0-3vmw.700.1.0.15843807-component-18902434.zip


# Get image list
Get-EsxImageProfile

# Example output
Name                           Vendor          Last Modified   Acceptance Level
----                           ------          -------------   ----------------
ESXi-8.0sb-21203431-standard   VMware, Inc.    2/14/2023 12:0… PartnerSupported
ESXi-8.0b-21203435-standard    VMware, Inc.    2/14/2023 12:0… PartnerSupported
ESXi-8.0sb-21203431-no-tools   VMware, Inc.    1/30/2023 5:35… PartnerSupported
ESXi-8.0b-21203435-no-tools    VMware, Inc.    1/30/2023 7:21… PartnerSupported

# Copy a profile
New-EsxImageProfile -CloneProfile "ESXi-8.0b-21203435-standard" -name "ESXi-8.0b-21203435-standard-nic" -vendor "tomo"

# Add driver files
Add-EsxSoftwarePackage -ImageProfile "ESXi-8.0b-21203435-standard-nic" -SoftwarePackage "nvme-community"
Add-EsxSoftwarePackage -ImageProfile "ESXi-8.0b-21203435-standard-nic" -SoftwarePackage "net-community"
Add-EsxSoftwarePackage -ImageProfile "ESXi-8.0b-21203435-standard-nic" -SoftwarePackage "vmkusb-nic-fling"

# Export ISO image
Export-EsxImageProfile -ImageProfile "ESXi-8.0b-21203435-standard-nic" -ExportToIso -FilePath /Users/tomo/Downloads/ESXi/ESXi-8.0b-21203435-standard-nic.iso -Force -NoSignatureCheck
After executing these commands, you should see the newly exported image ESXi-8.0b-21203435-standard-nic.iso in the directory.
Installation and Configuration
You can use Ventoy
to create a bootable USB drive and copy the image to it. The issue I encountered was compatibility with my mechanical keyboard, as the keys were unresponsive at the ESC/Enter interface. If you experience this, try using a more basic keyboard (such as the thin keyboard that comes with Dell computers).
If you reach this point, the basic system is essentially set up. We’ll cover installing virtual machines, enabling the integrated graphics card, and other topics in future articles.
To add some fun, I used frps+Caddyserver to enable public access. You can try this if you’re interested (you’ll need a public server and a domain name, but you can use ESXi’s native HTTPS and certificates if you don’t have a domain name).
- Access the ESXi management interface through the web portal and enable SSH service.
- SSH into the EXSi server and disable automatic redirection from HTTP to HTTPS (because we’re using a self-signed certificate with Caddyserver, we need to use the HTTP protocol for reverse proxy).
cd /etc/vmware/rhttpproxy/ # backup endpoints.conf cp endpoints.conf endpoints.conf.backendpoints.confconfigures the rules for URL paths. The fourth column is for redirection, change allredirecttoallowin the fourth column. - Restart the service
/etc/init.d/rhttpproxy restart
frp is a tunnel tool for internal networks. The server-side frps runs on a server with a public address, such as a cloud host, and frpc runs locally. Refer to the official GitHub repository for detailed installation instructions.
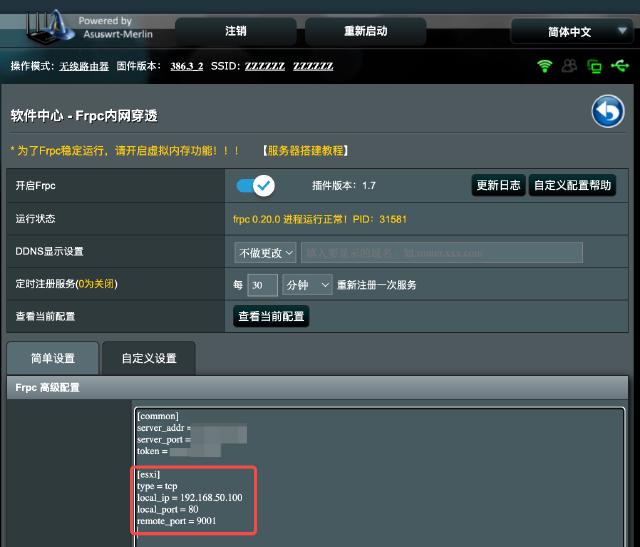
My router has custom firmware with a software center that includes the frpc tool. If your router doesn’t have frpc, you’ll need a machine on your internal network to run the frpc service permanently (you could create a virtual machine in ESXi and set it to auto-start). Remember to configure the firewall policy on the frps server to allow port 7000.
Here’s the configuration for the router (except for the common section, the names of the configuration sections need to be unique):

Here, 192.168.50.100 is the ESXi address, and 80 is its HTTP port number. On the public server, you can view the address that frps is listening on:
sudo netstat -natup|grep frps
tcp6       0      0 :::7000     :::*   LISTEN      1179303/frps
tcp6       0      0 :::9001     :::*   LISTEN      1179303/frps
7000 is the default communication port for frps, and 9001 is the remote_port configured in frpc. Here’s the Caddyserver configuration (you need to point your domain name to the server beforehand):
https://esxi.example.com {
  reverse_proxy 127.0.0.1:9001
}
The overall network path is as follows:
   https┌───────┐9001 ┌────┐7000 ┌────┐80 ┌────┐
   ────►│ caddy ├────►│frps├────►│frpc├──►│ESXi│
        └───────┘     └────┘     └────┘   └────┘
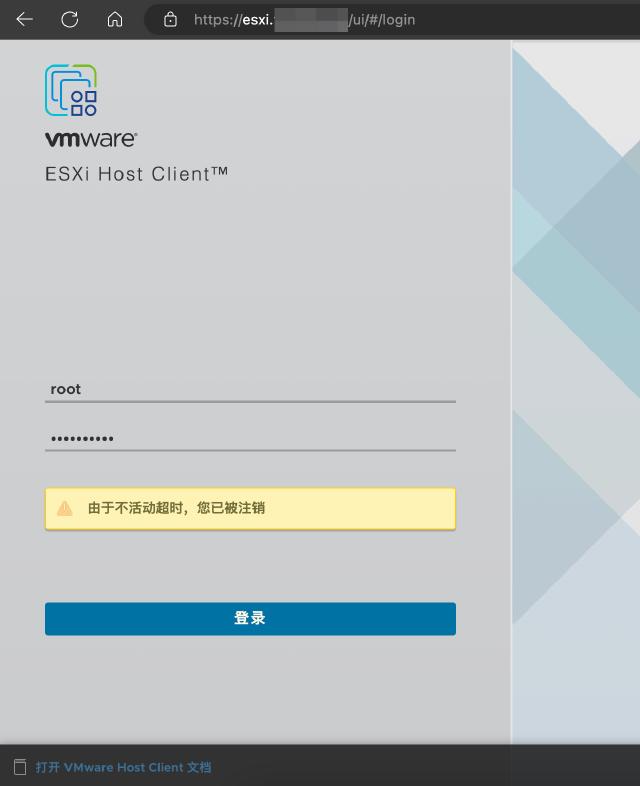
After completing the above setup, you can access the ESXi service directly from the public internet using your domain name (you can do the same for other services to enable public access).
