Preface
v2ray is a tool under Project V. The official documentation is available at https://www.v2fly.org/
.
This article will introduce how to use TLS+WebSocket with v2ray for more secure and efficient traffic proxying.
The overall component relationship is as follows:
┌───────┐ inbound   ┌───────┐ outbound  ┌──────────┐
│socks5/├──────────►│v2ray  ├──────────►│cloudflare│
│ http  │           │client │    ws     │   CDN    │
└───────┘           └───────┘           └─────┬────┘
                                              │
                                              ▼
                                           ┌─────┐ reverse ┌───────┐outbound
                                           │caddy├────────►│v2ray  ├───────► internet
                                           │     │  proxy  │server │
                                           └─────┘         └───────┘
The advantage of this solution is that it uses Caddyserver to load TLS traffic, and TLS+WebSocket can better conceal traffic. Moreover, WebSocket traffic can take advantage of Cloudflare’s global CDN for acceleration.
Installation
For specific installation instructions, please refer to the documentation . Here are the main steps:
curl -O https://raw.githubusercontent.com/v2fly/fhs-install-v2ray/master/install-release.sh
sudo bash install-release.sh
After installation, the configuration file path is /usr/local/etc/v2ray/config.json, and the script will install the v2ray.service service.
Configuration
The configuration is mainly divided into three parts: v2ray server, Cloudflare+Caddy, and v2ray client.
Server Configuration
Use the following sample configuration, mainly focusing on the inbounds configuration. The example uses the vless protocol to listen on port 10000. The clients configuration needs to be adjusted manually for verification purposes. streamSettings is the underlying transport configuration, where we configure the use of WebSocket.
For detailed configuration parameters and explanations, please refer to https://www.v2ray.com/chapter_02/01_overview.html
{
  "log": {
    "loglevel": "warning"
  },
  "policy": {
    "levels": {
      "0": {
        "statsUserUplink": true,
        "statsUserDownlink": true
      }
    },
    "system": {
      "statsInboundUplink": true,
      "statsInboundDownlink": true,
      "statsOutboundUplink": true,
      "statsOutboundDownlink": true
    }
  },
  "routing": {
    "domainStrategy": "AsIs",
    "rules": [
      {
        "type": "field",
        "ip": [
          "geoip:private"
        ],
        "outboundTag": "block"
      }
    ]
  },
  "inbounds": [
    {
      "port": 10000,
      "listen": "127.0.0.1",
      "protocol": "vless",
      "tag": "tcp",
      "settings": {
        "clients": [
          {
            "email": "EMAIL",
            "id": "UUID",
            "alterId": 64
          }
        ],
        "decryption": "none"
      },
      "streamSettings": {
        "network": "ws",
        "wsSettings": {
          "path": "/ray"
        }
      }
    }
  ],
  "outbounds": [
    {
      "protocol": "freedom",
      "tag": "direct",
      "settings": {}
    },
    {
      "protocol": "blackhole",
      "tag": "block",
      "settings": {}
    }
  ]
}
After configuring the server, we can start the service using sudo systemctl start v2ray.service.
Caddy + Cloudflare
The above server configuration only sets the protocol and transport configuration. To handle TLS and acceleration for the server, additional tools are needed.
Using TLS requires a domain name (the domain name needs to be pointed to the server address in advance). First, install Caddyserver, which can automatically manage certificate renewal. Then edit the Caddyserver configuration file /etc/caddy/Caddyfile:
https://v.example.com {
    log {
        output file /var/log/caddy/v2ray.log
        format json
        level INFO
    }
    # Set this path to your site's directory.
    root * /usr/share/caddy

    # Enable the static file server.
    file_server

    @v2ray_websocket {
        path /ray
        header Connection *pgrade # fast suffix match for [Uu]pgrade
        header Upgrade websocket
    }
    reverse_proxy @v2ray_websocket localhost:10000
}
Please note the @v2ray_websocket configuration. The example configuration indicates matching requests with the /ray prefix and HTTP headers including Connection=U|upgrade and Upgrade=websocket. This HTTP header is typically used to upgrade an HTTP connection to a WebSocket connection. For details on the HTTP protocol Upgrade mechanism, please refer to the documentation Protocol upgrade mechanism
.
After configuring Caddy, we can restart Caddyserver to load the latest configuration and then access our domain name.
Of course, if you are not familiar with Caddyserver, you can also use other tools such as Nginx for reverse proxy. The principle is similar, and you can refer to https://guide.v2fly.org/advanced/wss_and_web.html .
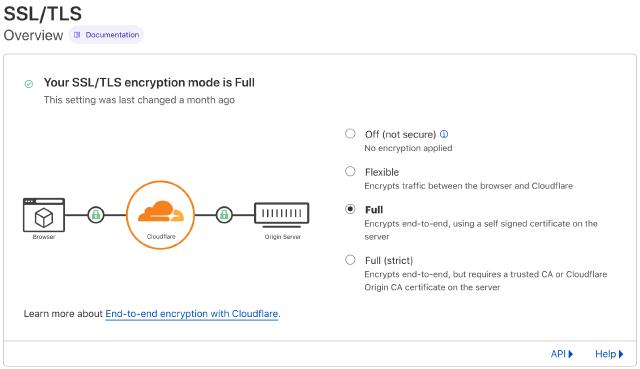
After verifying the configuration, we proceed to configure Cloudflare. You only need to perform resolution in the Cloudflare background (the domain name resolution needs to be migrated to Cloudflare in advance), as shown in the figure below (for example only).

Please note the SSL/TLS configuration of Cloudflare. Because Caddyserver comes with a certificate, you need to choose the Full mode here.

Client Configuration
The v2ray client and server actually use the same binary file, but the inbound and outbound configurations are different. For ease of operation, we can also choose a graphical client.
In the following configuration, mainly focus on streamSettings and settings in outbounds, which need to be consistent with the server configuration.
{
  "inbounds": [
    {
      "listen": "127.0.0.1",
      "protocol": "socks",
      "settings": {
        "udp": false,
        "auth": "noauth"
      },
      "port": "1080"
    },
    {
      "listen": "127.0.0.1",
      "protocol": "http",
      "settings": {
        "timeout": 360
      },
      "port": "1087"
    }
  ],
  "outbounds": [
    {
      "mux": {
        "enabled": false,
        "concurrency": 8
      },
      "protocol": "vless",
      "streamSettings": {
        "wsSettings": {
          "path": "/ray",
          "headers": {
            "host": "v.example.com"
          }
        },
        "tlsSettings": {
          "serverName": "v.example.com",
          "allowInsecure": false
        },
        "security": "tls",
        "network": "ws"
      },
      "tag": "proxy",
      "settings": {
        "vnext": [
          {
            "address": "v.example.com",
            "users": [
              {
                "encryption": "none",
                "id": "UUID",
                "level": 0,
                "flow": ""
              }
            ],
            "port": 443
          }
        ]
      }
    },
    {
      "tag": "direct",
      "protocol": "freedom",
      "settings": {
        "domainStrategy": "UseIP",
        "userLevel": 0
      }
    },
    {
      "tag": "block",
      "protocol": "blackhole",
      "settings": {
        "response": {
          "type": "none"
        }
      }
    }
  ],
  "dns": {},
  "routing": {
    "settings": {
      "domainStrategy": "AsIs",
      "rules": []
    }
  },
  "transport": {}
}
Results
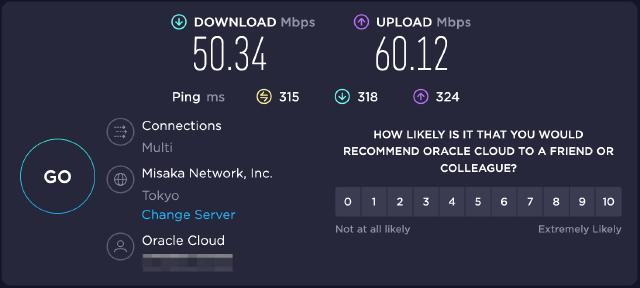
After the client configuration is successful, we can configure our local proxy in the browser, such as socks5://127.0.0.1:1080. Then we can use a network speed test tool to test the proxy speed, and we can see that both download and upload speeds are quite good.
