前言
在最开始搭建博客的文章
中,我纂写了一个Makefile用来将我的博客进行编译并上传到我远端的服务器:
build:
	hugo --minify

deploy: build
	${RSYNC} public/ [email protected]:/var/www/tomo.dev/
当然,作为程序员总是很懒的,很多东西都想考虑自动化。早些年用过Jenkins、Ansible等工具,其实都属于CI CD的范畴。GitHub提供强大的GitHub Actions功能,可以满足持续集成、持续发布的需求。GitHub官方有非常多详细的教程及模板,参考https://docs.github.com/en/actions
,
所以在此就不进行赘述,本文主要涉及部署到服务器时涉及到的密钥安全问题。
GitHub Actions
出于安全性,一般服务器都是使用公私钥通过SSH进行登录等操作,而更安全的做法会给私钥设置passphrase口令。
GitHub Actions商店有安装SSH Key的Action,链接为https://github.com/marketplace/actions/install-ssh-key , 但是该Action不支持加密的私钥,在链接中,提供了几种解决方案:
- decrypting key beforehand: best bet, and works on any VM
- sshpass command: next best bet, but not supported on Windows
- expect command: be careful not to expose passphrase to console
- SSH_ASKPASS environment variable: might be troublesome
方案1,可以将加密后的私钥进行解密,然后配置到GitHub Secret中,解密命令为openssl rsa -in ~/.ssh/id_rsa -out id_rsa_decrypt。
方案2和3,可以使用一些命令行工具给私钥提供口令。
方案4是使用SSH_ASKPASS环境变量提供密钥。
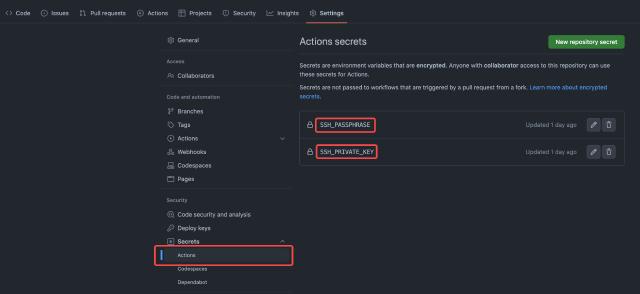
这里我们使用的是方案4,配合ssh-agent进行处理。首先我们需要在仓库中配置我们的私钥和口令,如下图:

将我们的部署action文件放到项目的.github/workflows目录下,我们希望在main或者master
分支的提交触发该GitHub Action,然后执行以下步骤:
- 配置私钥和口令,并配置
ssh-agent,其中SSH_AUTH_SOCK环境变量保证跨session时可以共享认证代理 - 配置
known_hosts,将我们的服务器域名配置到known_hosts中 - 获取仓库代码
- 安装
hugo - 编译并通过
rsync将静态文件传至服务器
完整的配置内容如下:
name: Deploy tomo.dev
env:
  # Use the same ssh-agent socket value across all jobs
  # Useful when a GH action is using SSH behind-the-scenes
  SSH_AUTH_SOCK: /tmp/ssh_agent.sock

on:
  push:
    branches:
    - main
    - master
jobs:
  deploy-to-server:
    runs-on: ubuntu-latest
    steps:
    # Start ssh-agent but set it to use the same ssh_auth_sock value.
    # The agent will be running in all steps after this, so it
    # should be one of the first.
    - name: Setup SSH passphrase
      env:
        SSH_PASSPHRASE: ${{secrets.SSH_PASSPHRASE}}
        SSH_PRIVATE_KEY: ${{secrets.SSH_PRIVATE_KEY}}
      run: |
        ssh-agent -a $SSH_AUTH_SOCK > /dev/null
        echo 'echo $SSH_PASSPHRASE' > ~/.ssh_askpass && chmod +x ~/.ssh_askpass
        echo "$SSH_PRIVATE_KEY" | tr -d '\r' | DISPLAY=None SSH_ASKPASS=~/.ssh_askpass ssh-add - >/dev/null

    - name: Adding Known Hosts
      run: mkdir -p ~/.ssh/ && ssh-keyscan -H tomo.dev >> ~/.ssh/known_hosts

    - name: Check out repository code
      uses: actions/checkout@v3

    - name: Install hugo
      run: sudo apt install -y hugo

    - name: deploy
      run: make deploy
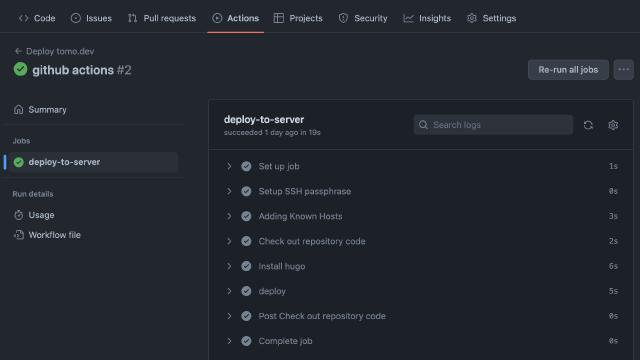
最后将代码提交并进行PUSH,打开GitHub仓库的Actions菜单,可以看到如下列表:

点击进去可以看到执行的详细步骤及耗时:

后续就不需要手动执行make deploy操作了。可以在Action执行之后,查看网站是否更新。