前言
v2ray是Project Y项目下的工具,官方文档地址https://www.v2fly.org/
。本文介绍如何使用TLS+WebSocket配合v2ray更安全、高效地进行流量代理。
整体组件关系如下:
┌───────┐ inbound   ┌───────┐ outbound  ┌──────────┐
│socks5/├──────────►│v2ray  ├──────────►│cloudflare│
│ http  │           │client │    ws     │   CDN    │
└───────┘           └───────┘           └─────┬────┘
                                              │
                                              ▼
                                           ┌─────┐ reverse ┌───────┐outbound
                                           │caddy├────────►│v2ray  ├───────► internet
                                           │     │  proxy  │server │
                                           └─────┘         └───────┘
该方案的优点是,使用Caddyserver来负载TLS流量,通过TLS+WebSocket可以更好地隐匿流量, 而且WebSocket流量可以利用Cloudflare的全球CDN进行加速。
安装
具体安装参考文档 ,这里列下主要步骤。
curl -O https://raw.githubusercontent.com/v2fly/fhs-install-v2ray/master/install-release.sh
sudo bash install-release.sh
安装后配置文件路径为/usr/local/etc/v2ray/config.json,同时脚本会安装v2ray.service
服务。
配置
配置主要分三个部分,v2ray服务端,Cloudflare+Caddy,v2ray客户端
服务端配置
使用如下sample配置,主要关注其中inbounds配置,示例中使用vless协议监听10000端口,clients配置需要手动调整,做验证用。streamSettings为底层传输配置,这里我们配置使用WebSocket。
细节的配置参数与说明,参考https://www.v2ray.com/chapter_02/01_overview.html
{
  "log": {
    "loglevel": "warning"
  },
  "policy": {
    "levels": {
      "0": {
        "statsUserUplink": true,
        "statsUserDownlink": true
      }
    },
    "system": {
      "statsInboundUplink": true,
      "statsInboundDownlink": true,
      "statsOutboundUplink": true,
      "statsOutboundDownlink": true
    }
  },
  "routing": {
    "domainStrategy": "AsIs",
    "rules": [
      {
        "type": "field",
        "ip": [
          "geoip:private"
        ],
        "outboundTag": "block"
      }
    ]
  },
  "inbounds": [
    {
      "port": 10000,
      "listen": "127.0.0.1",
      "protocol": "vless",
      "tag": "tcp",
      "settings": {
        "clients": [
          {
            "email": "EMAIL",
            "id": "UUID",
            "alterId": 64
          }
        ],
        "decryption": "none"
      },
      "streamSettings": {
        "network": "ws",
        "wsSettings": {
          "path": "/ray"
        }
      }
    }
  ],
  "outbounds": [
    {
      "protocol": "freedom",
      "tag": "direct",
      "settings": {}
    },
    {
      "protocol": "blackhole",
      "tag": "block",
      "settings": {}
    }
  ]
}
配置好服务端后,我们通过sudo systemctl start v2ray.service启动服务。
Caddy + Cloudflare
上面的服务端配置只设置了协议及传输配置,如何对服务端进行TLS处理及加速,则需要额外的工具。使用TLS的前提是需要一个域名(域名需要提前指向该服务器地址)。首先安装Caddyserver,
Caddyserver可以自动管理证书的刷新。之后编辑Caddyserver配置文件/etc/caddy/Caddyfile:
https://v.example.com {
    log {
        output file /var/log/caddy/v2ray.log
        format json
        level INFO
    }
    # Set this path to your site's directory.
    root * /usr/share/caddy

    # Enable the static file server.
    file_server

    @v2ray_websocket {
        path /ray
        header Connection *pgrade # fast suffix match for [Uu]pgrade
        header Upgrade websocket
    }
    reverse_proxy @v2ray_websocket localhost:10000
}
需要注意的是其中的@v2ray_websocket配置,示例中的配置表示匹配/ray前缀,且HTTP头包括Connection=U|upgrade及Upgrade=websocket的请求,该HTTP头典型的应用场景就是将HTTP连接升级为WebSocket。具体HTTP协议的Upgrade机制,可以参考文档Protocol upgrade mechanism
。
配置完Caddy后,我们可以重启Caddyserver加载最新的配置,然后访问我们的域名。
当然如果你不熟悉Caddyserver,也可以用Nginx等其他工具做反向代理,原理是类似的,可以参考https://guide.v2fly.org/advanced/wss_and_web.html 。
配置验证后,我们继续配置Cloudflare,只需在Cloudflare后台进行解析(需要提前将域名解析迁移至Cloudflare), 如下图(仅做示例)

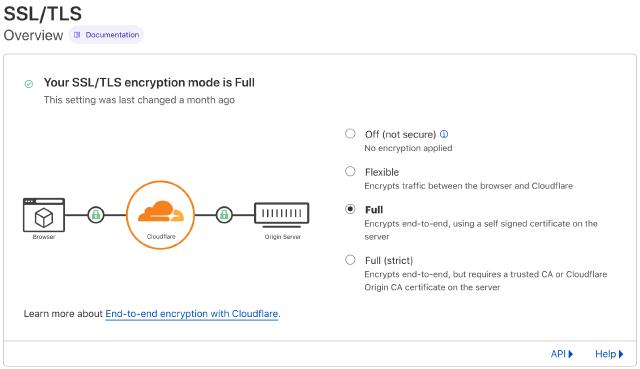
需要注意的是Cloudflare的SSL/TLS配置,因为Caddyserver本身自带了证书,这边需要选择Full的模式。

客户端配置
v2ray客户端和服务端其实用的同一个二进制文件,只是配置中的inbound与outbound不同。一般为了方便操作,我们也可以选择图形化客户端。
如下的配置中,主要关注outbounds中streamSettings与settings,需要与服务端配置保持一致。
{
  "inbounds": [
    {
      "listen": "127.0.0.1",
      "protocol": "socks",
      "settings": {
        "udp": false,
        "auth": "noauth"
      },
      "port": "1080"
    },
    {
      "listen": "127.0.0.1",
      "protocol": "http",
      "settings": {
        "timeout": 360
      },
      "port": "1087"
    }
  ],
  "outbounds": [
    {
      "mux": {
        "enabled": false,
        "concurrency": 8
      },
      "protocol": "vless",
      "streamSettings": {
        "wsSettings": {
          "path": "/ray",
          "headers": {
            "host": "v.example.com"
          }
        },
        "tlsSettings": {
          "serverName": "v.example.com",
          "allowInsecure": false
        },
        "security": "tls",
        "network": "ws"
      },
      "tag": "proxy",
      "settings": {
        "vnext": [
          {
            "address": "v.example.com",
            "users": [
              {
                "encryption": "none",
                "id": "UUID",
                "level": 0,
                "flow": ""
              }
            ],
            "port": 443
          }
        ]
      }
    },
    {
      "tag": "direct",
      "protocol": "freedom",
      "settings": {
        "domainStrategy": "UseIP",
        "userLevel": 0
      }
    },
    {
      "tag": "block",
      "protocol": "blackhole",
      "settings": {
        "response": {
          "type": "none"
        }
      }
    }
  ],
  "dns": {},
  "routing": {
    "settings": {
      "domainStrategy": "AsIs",
      "rules": []
    }
  },
  "transport": {}
}
结果
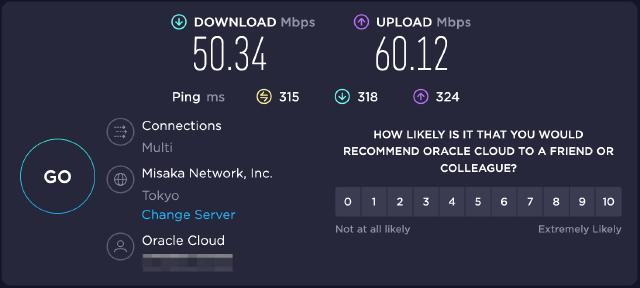
在客户端配置成功后,我们可以在浏览器配置我们的本地代理,比如socks5://127.0.0.1:1080。然后可以使用网速测试工具测试下代理的速度,可以看到下载和上传速度均较为可观。
